Tassel Tree Garland
Christmas or special occasion tree garland. Use yarn, glue, twine, & your choice of decorative items.
Also see:
Tips From The Workroom & Trails
Craft Projects
Home Improvement
Christmas Sewing & Crafts
Check out our Christmas Cat sewing pattern! A favorite pattern over the years, it can be made in fabric for any holiday. Wouldn’t the cat be perfect with the garland?
Disclosure: This site contains affiliate links. As an Amazon Associate, I earn from qualifying purchases. Clicking on links, and purchasing products, may result in the seller paying us compensation - at no extra cost to you. Affiliate links are in green.
The following photo was taken after our hearth was chalk painted. Go to: Chalk Paint Hearth for instructions.
Christmas Tree Garland
DETERMINE GARLAND LENGTH
We taped one end of the twine to the wall on one side of the fireplace. We then ran the twine across the front and second side of the fireplace, and marked that end with tape. We measured that full length.
Our garland, when finished, was 72” in length.
We did NOT cut the twine at this time.
To allow for a loop at each end of the twine, we added 12” to our computed length (6” per side for a loop). We then tied a loop onto the first end of the twine. This loop will be used as a hanger for the garland (the garland will hang from small wall hooks when finished).
Our garland was 72” in length. Adjust yours as needed. See the step below, “Determine Garland Length”.
Click on photos for larger version.
SUPPLIES
Yarn - 8 trees of light color scheme; 9 trees of green color scheme - total of 17 trees
The reason for the uneven number is that you need a center tree, and then an even number of trees on each side of center. Our center tree was green, so we needed one extra green tree.
For the yarn, we found the best deal at our local Michaels store. It was $3.49 per skein (October 2022): 4.5 oz / 285 yards for the Impeccable by Loops & Threads (green trees), and $4.19 per skein for the Skein Tones by Lyon: 3.5 oz / 185 yards (light trees). One skein of each color was more than enough for the 14 trees. We will be using the remaining yarn for another tree project.
Each tree is made of 3 tassels - one of each color. One tassel creates one tree layer, and each tree has three layers. The green trees consist of a light green tassel at the top, a mid green at the middle, and a dark green tassel at the bottom. The bottom tassel is slightly fuller than the upper two tassels. The light colored trees are made in the same way.
Yarns we used:
Greens: Impeccable by Loops & Threads
1 skein each of: Deep Forest, Forest, and Fern. Total cost: $10.50.
Lights: Skein Tones by Lyon
1 skein each of: Hazelnut, Almond and Ivory. Total cost: $12.60.
Other Supplies
These are the supplies we used for decorating the trees and garland string. Choose decorations per your taste.
20 mm Wood Beads
We found the pre-drilled wood beads on Amazon. 20 mm wooden beads. We bought a bulk bag of 300 because we knew we would use them on other projects.
Wood Stars & Letters
We found our wood stars on Amazon. We used Wood Star Cutouts 3/4” x 3/16”, pack of 100 stars (we will also use these on other projects).
Dotting Tools
I used dotting tools on the stars. They create perfect circles.
Twine
We strung the trees on twine. Choose twine, yarn, or material of your choice.
Acrylic Paints
I used various acrylic paints, plus a gold glitter paint, to paint my decorative stars. I created a few stars to show you what they can look like. We used one gold star, with white dots (created with the help of a dotting tool), plus unpainted stars, plus the “God Jul” letters (painted red).
INSTRUCTIONS
TASSELS
Besides our detailed instructions and photos, we have created a video for you. It is just after these instructions.
1. Cut Short & Long Yarn Pieces
For the number of trees you are making, cut one 6” and one 9” piece of yarn for each tassle of each tree. For example, for the green trees, I had 7 “fern” tassles (7 trees, and each had one tasle in the color “fern”). From the “fern” yarn, I cut 7 6” pieces, and 7 9” pieces of yarn. I repeated with each color needed.
Set the yarn pieces aside.
TIP: I worked with only one tassle color at a time. That way, I didn’t get overwhelmed with too many pieces of yarn lying around. I made all the fern tassles needed, then moved on to the next color. I put the tassles into zip-lock bags, separated by color, until I was ready to glue them together to create the trees. Use whatever method works best for you.
2. Cut Cardboard
Cut a piece of corrugated cardboard 2” x 3”. The yard will be wrapped around the cardboard to create the tassel.
TIP: Cut an extra rectangle of cardboard because the cutting edge may become frayed with continued use. I went through 3 pieces of cardboard.
3. Create The Tassel
Step 1: Place Top Tie Piece Of Yarn
Place one piece of 6” yarn across the top of a piece of cardboard. Make sure the two ends are tucked into the top corners of the cardboard (this is why corrugated cardboard is used).
Step 2: Wind Yarn For Tassel
Starting at the bottom, wind the yarn up and over the top of the cardboard piece, and back down to the bottom (front to back or back to front - either works).
NOTE: the starting and ending of the wrapping occurs at the bottom of the cardboard piece.
For the upper two tassels on each tree, wrap 20 times.
For the lower tassel on each tree, wrap 30 times.
Step 3: Tie Off Top
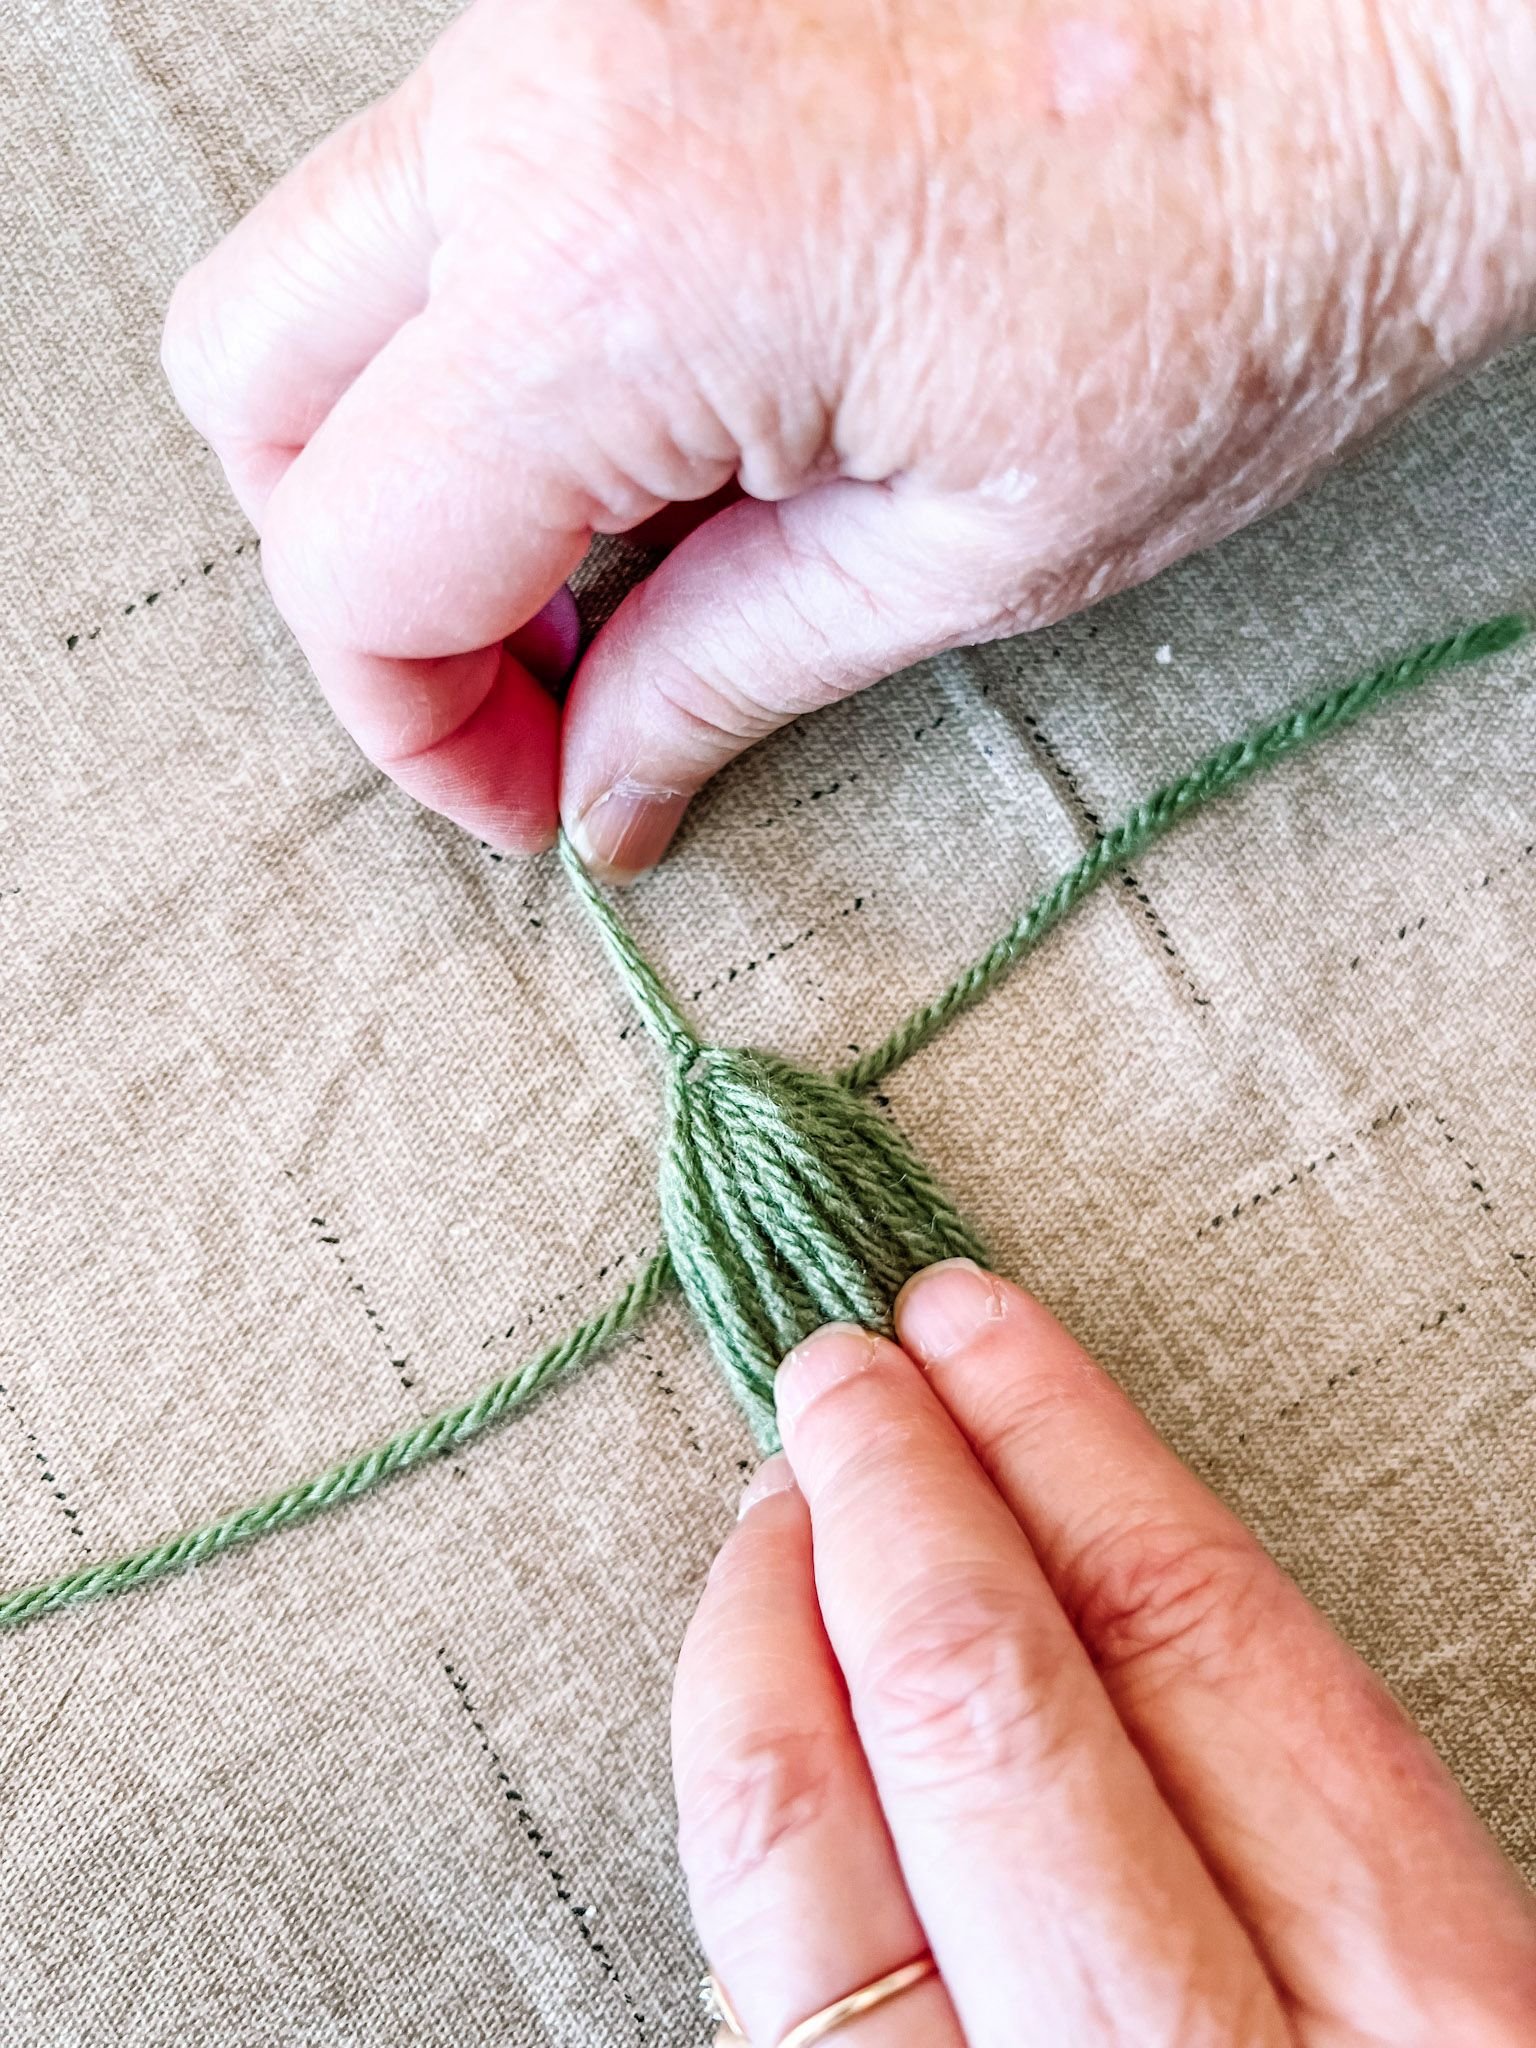
Once the wrapping is done, release the top string that you hooked into the cardboard. Use that to tie a double knot - tight - to hold all yarns together. DO NOT CUT THE YARN ENDS - they will be used for tying the tassel to the twine.
DO NOT CUT THE YARN ON THE LOWER EDGE UNTIL YOU HAVE TIED OFF THE TOP!
Step 4: Cut Yarnst
After you have tied the yarn at the top, use sharp scissors to cut across the yarn on the lower piece of the cardboard.
Step 5: Tie Off “Head”
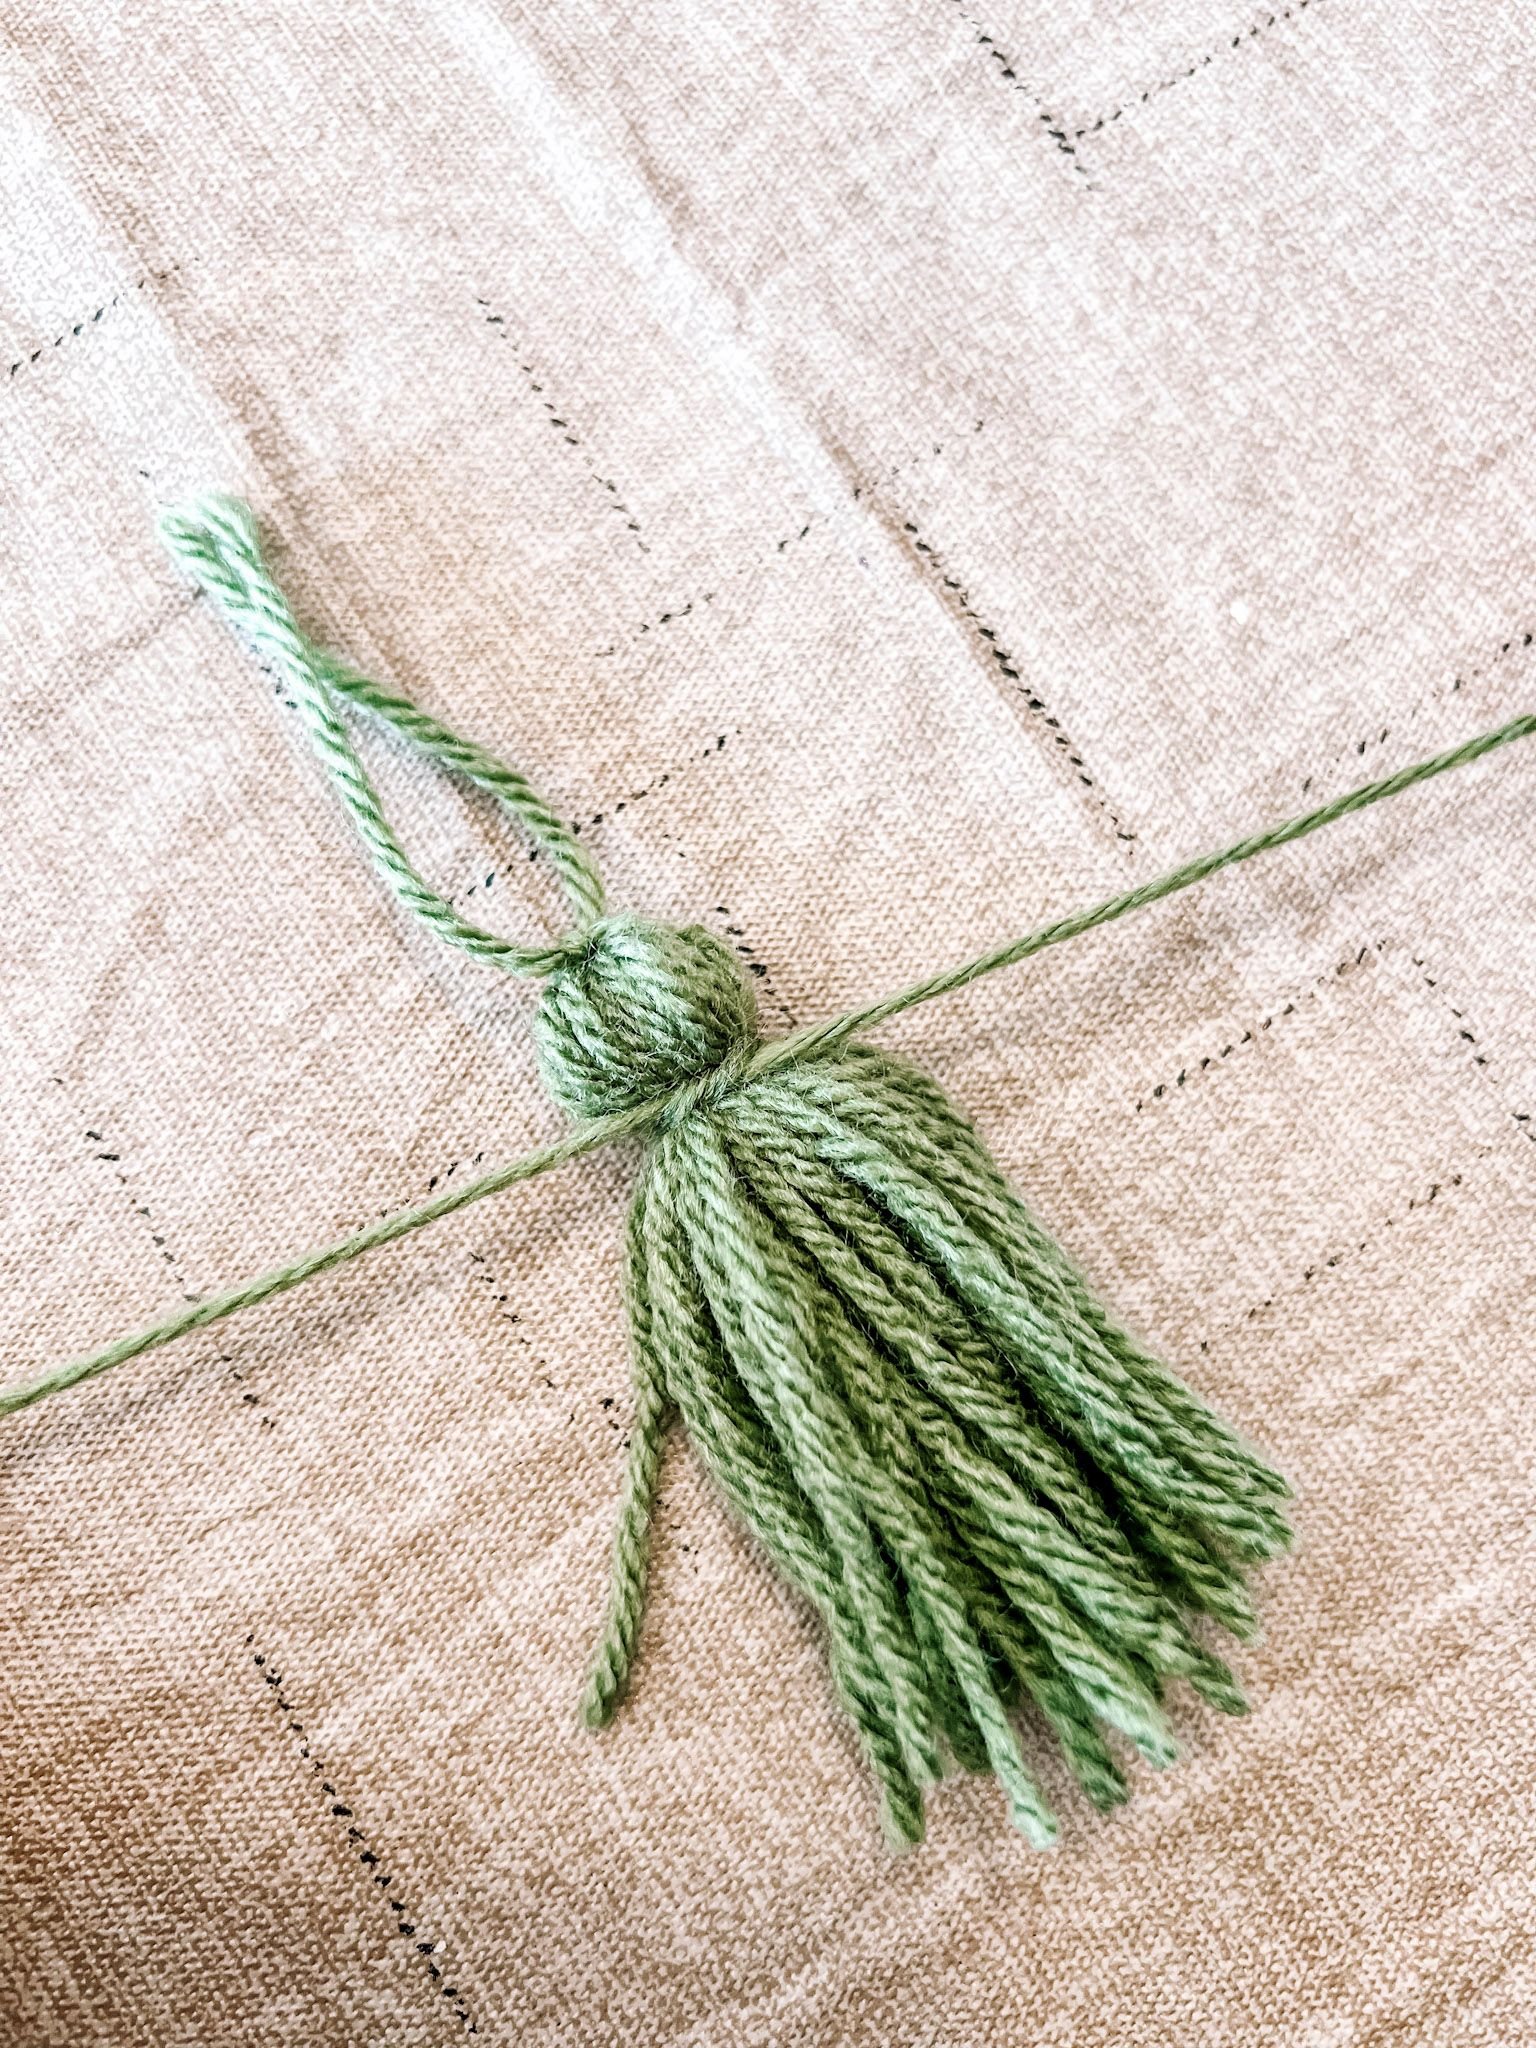
Take one 9” piece of yarn and wrap it around the tassel toward the top. Tie a double knot. Trim the ends to the same general length as the other tassel yarn pieces. This creates the “head” of the tassel.
NOTE: We created different sized “heads” depending on the layer.
Top tassle: 1”
Middle tassle: 1/2”
Lower tassle: no more than 3/4” - that layer is fuller, so 1/2” can be difficult
Step 6: Cut Loose Top Yarn Pieces
Final step: For the lower 2 tassels only: cut the loose top yarn pieces close to the knot. Do NOT cut the loose top yarns from any of the top tassels - they are needed for hanging the tassel.
NOTE: Notice the lightest green (top tassel) does NOT have the loose tie ends cut. You will need the top tassel yarn ends for tying the tassel to the garland twine. Only the lower two tiers have the top tie ends cut off.
Step 6: Glue The Tree Tassels Together
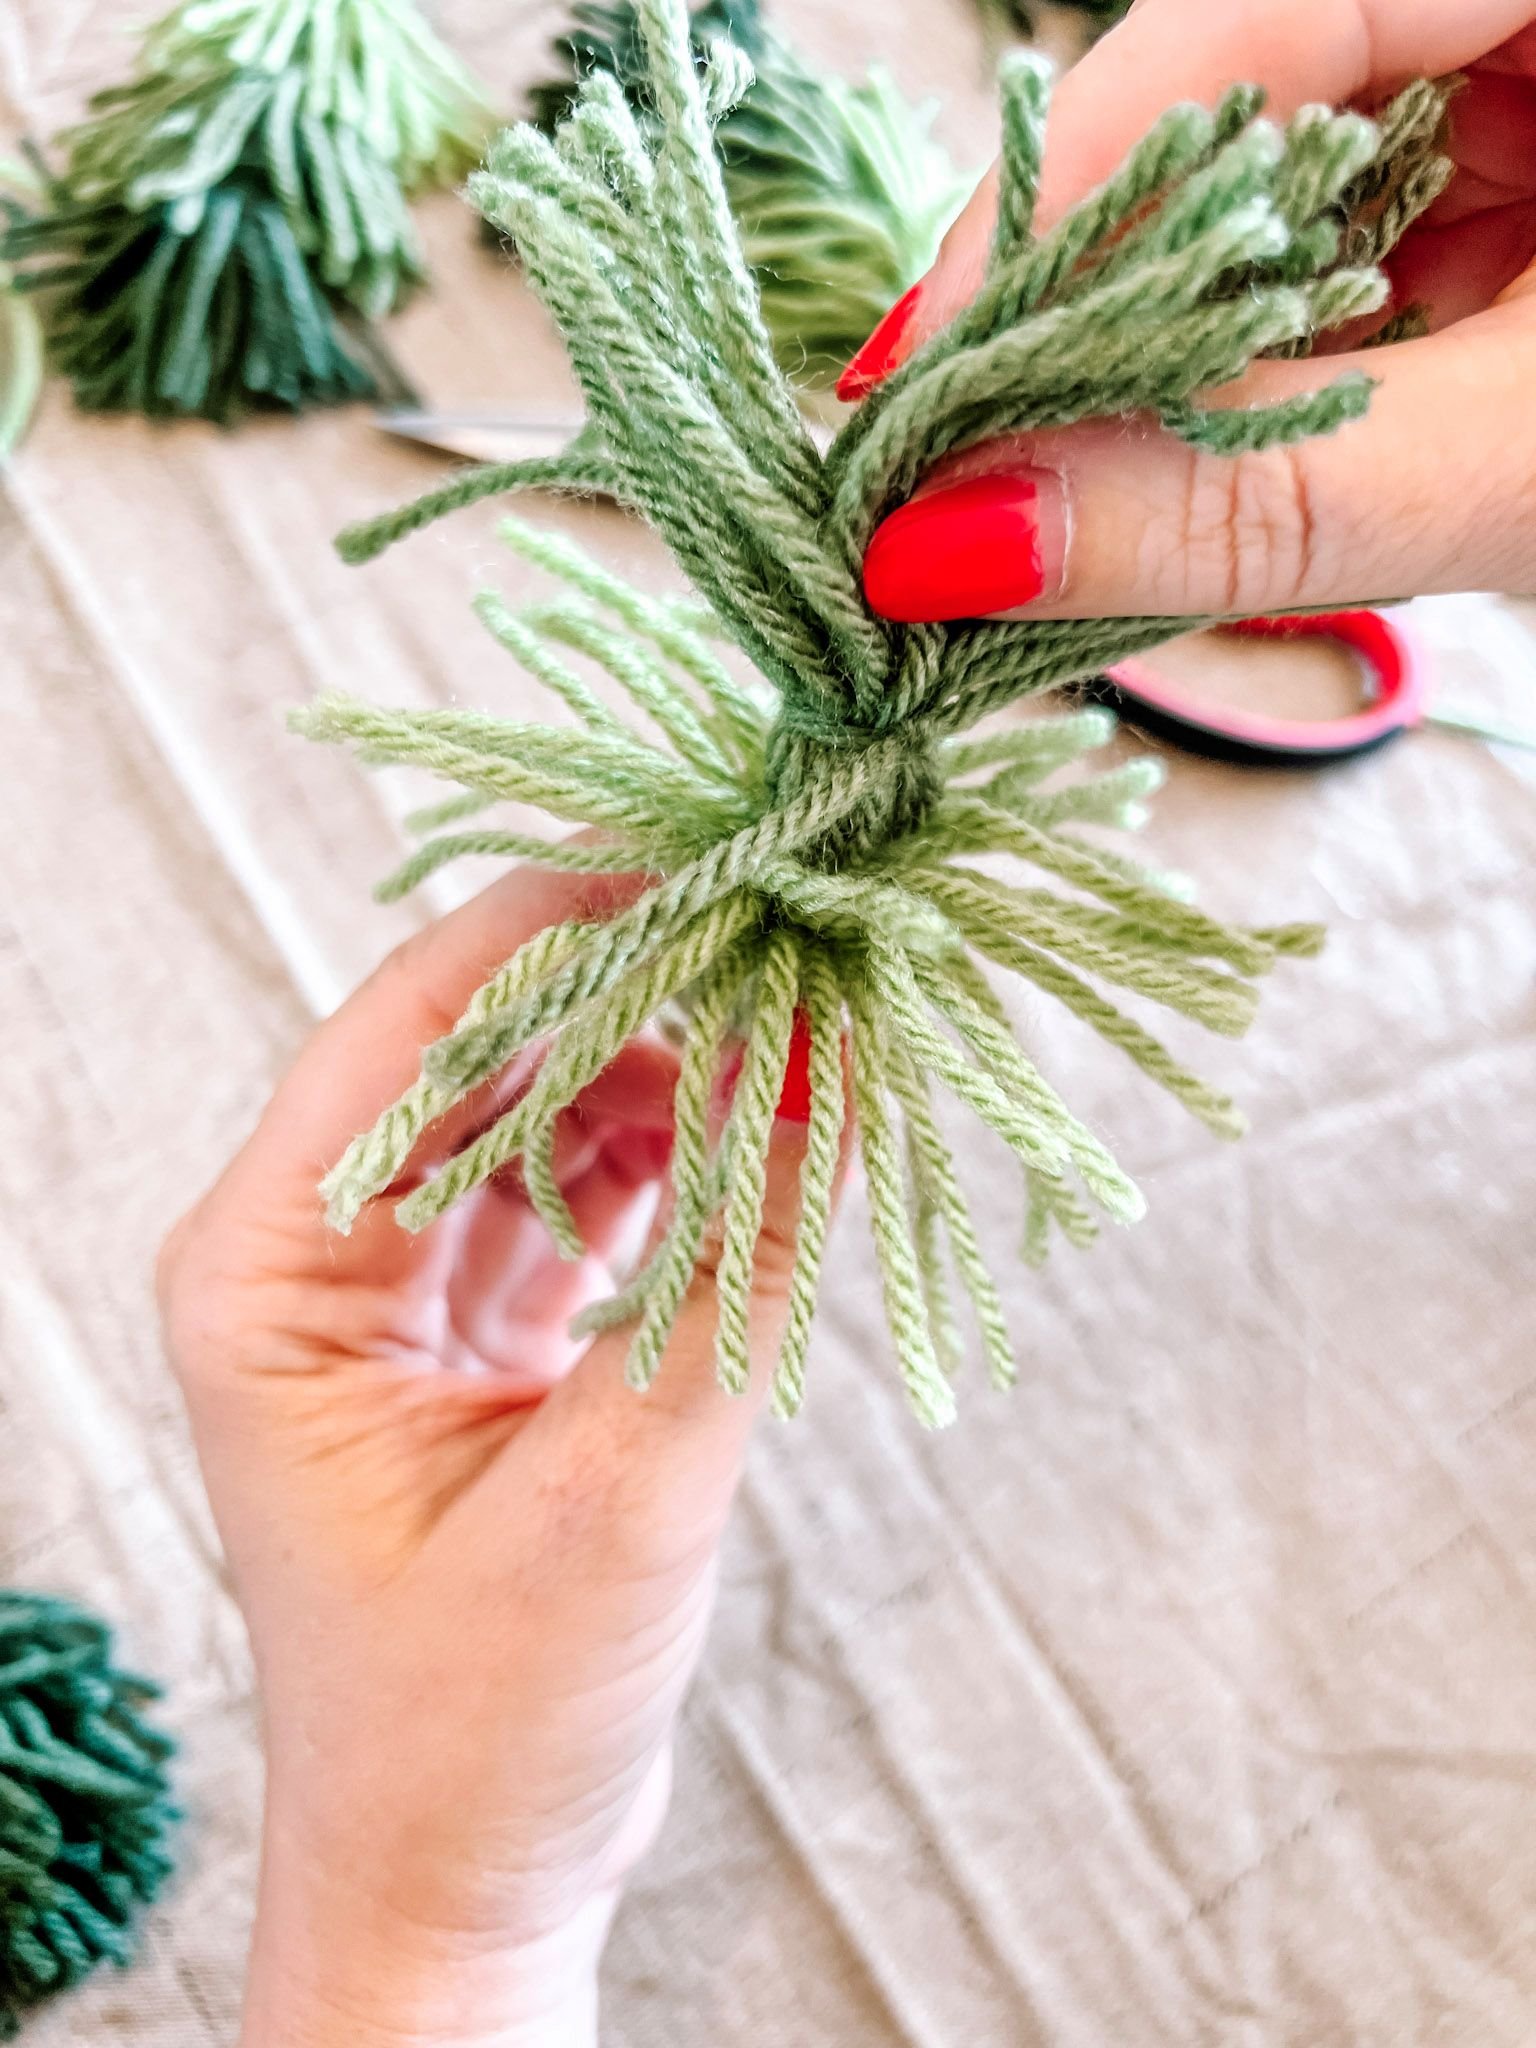
Each tree consists of 3 tassels. The top tier is the lightest (and still has the loose yard ends at the top).
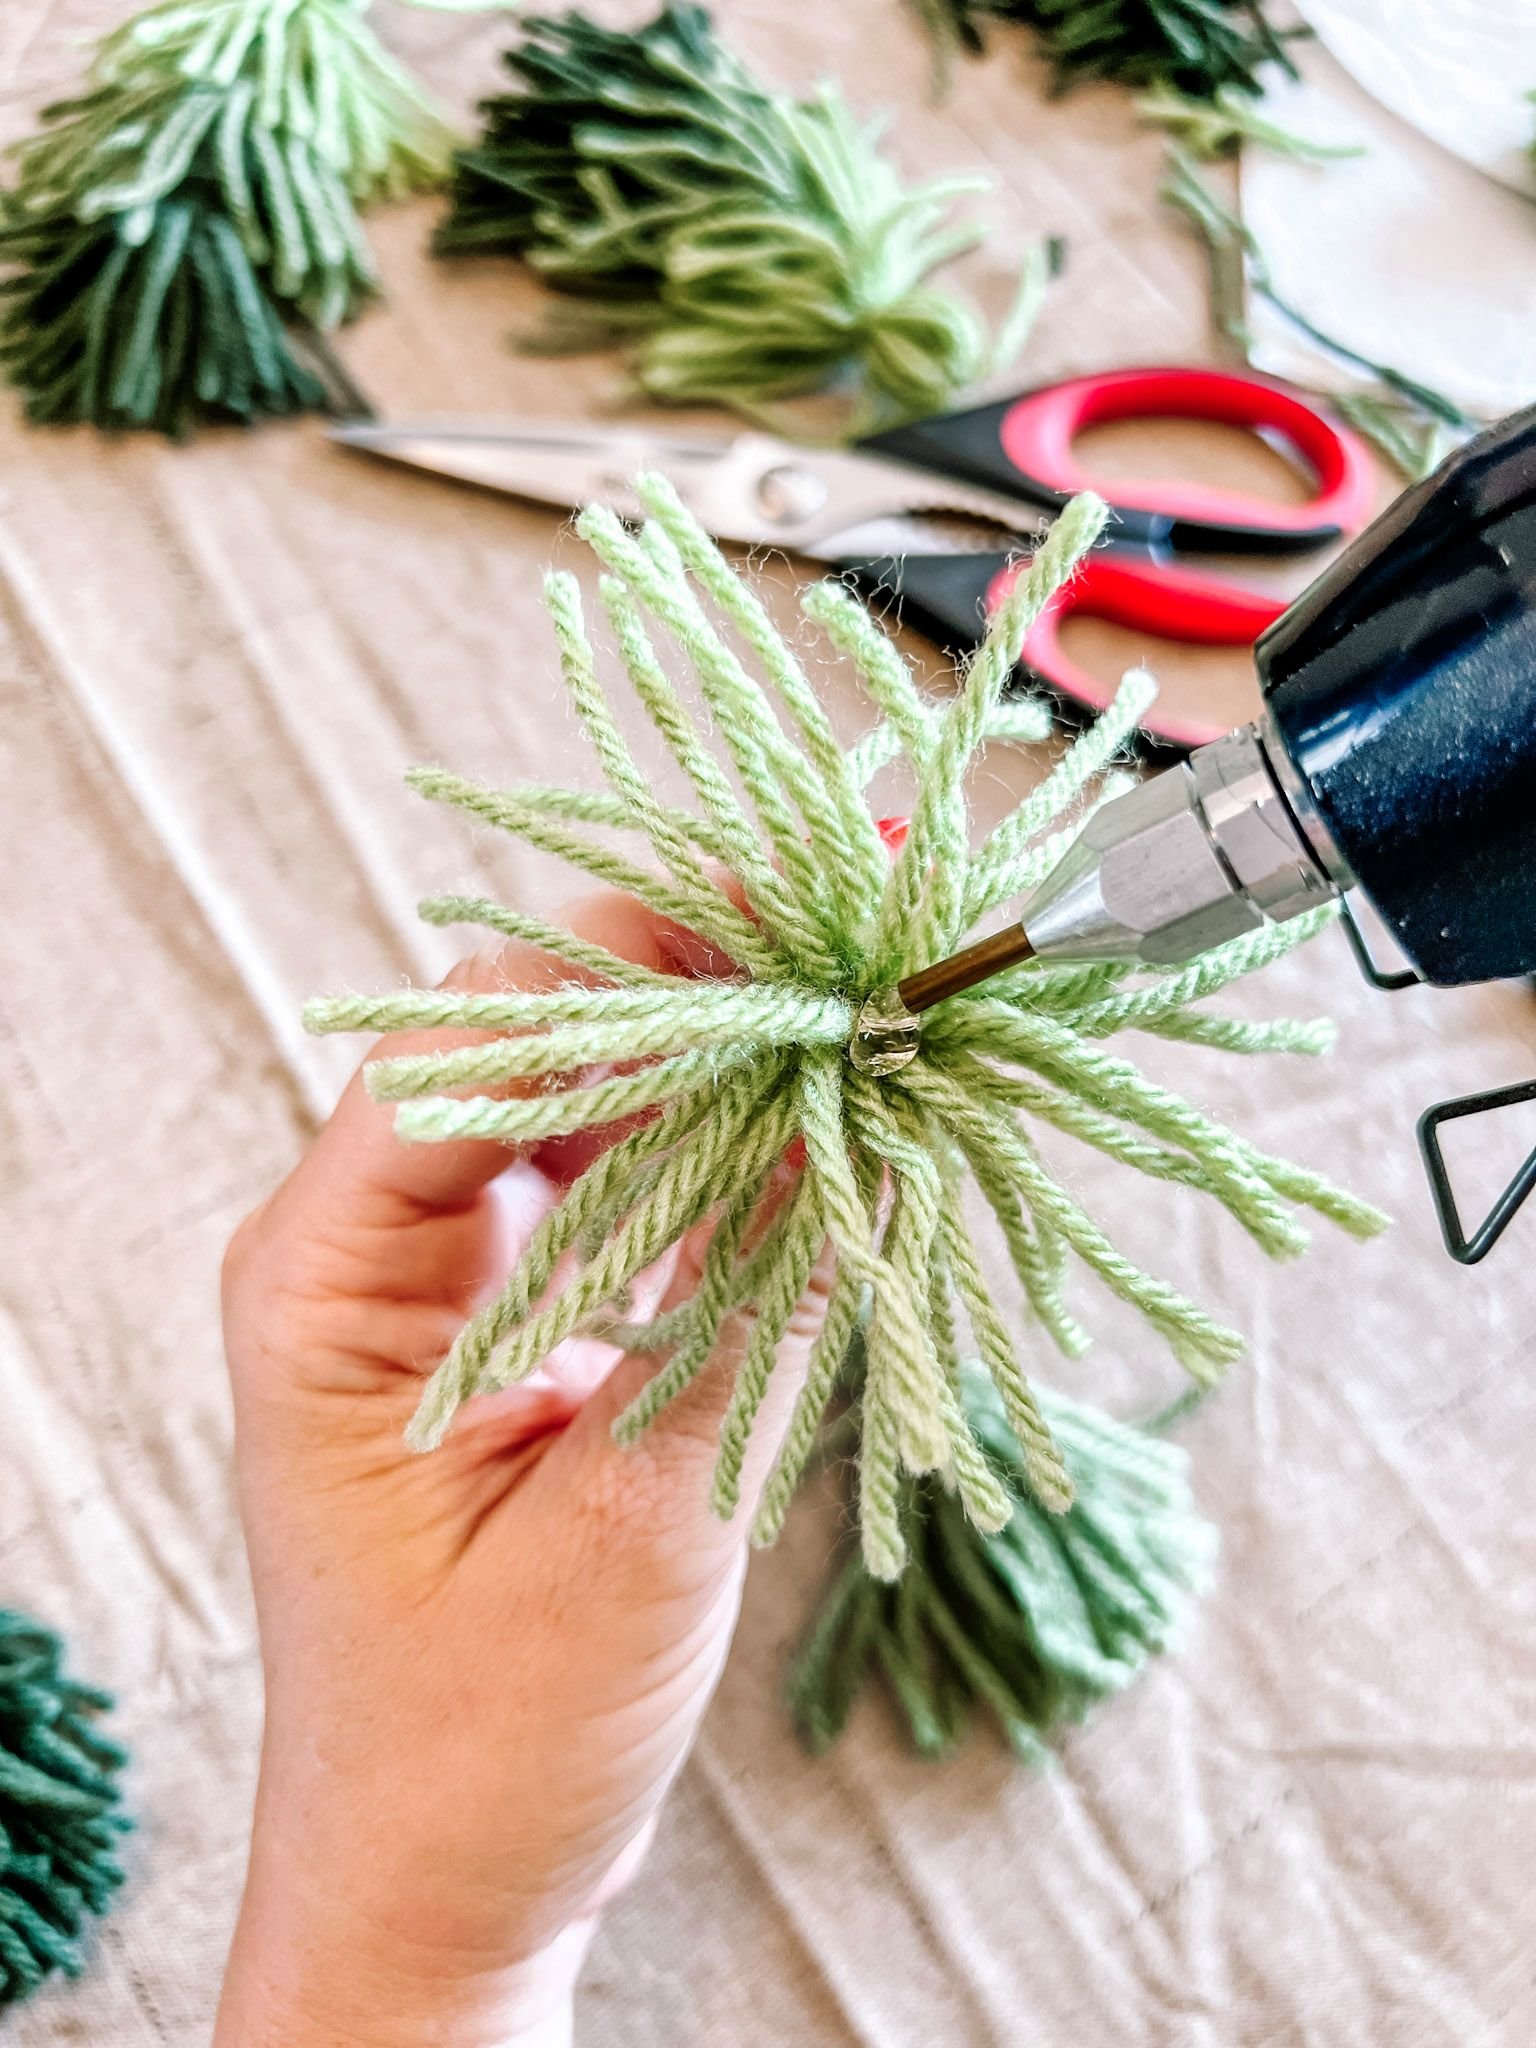
Flip the top tassel upside down. Using the glue gun, place a drop of glue on the underside of the tassel. Place the “head” of the second tier tassel onto the dot of glue.
Repeat with third (lowest) tier.
GARLAND
1. Paint Tassel Decor
Paint tree and garland decor per your desired look. We painted the center star gold, and left the remaining stars unpainted, on our first garland. We used dotting tools to add white circles. We painted the letters for “God Jul” red.
We also painted a second set of stars, and letters for “Merry Christmas”, for a second garland.
2. Assemble Garland
Step 1: Lay out trees and wood balls next to twine
Lay out all trees and decor to be sure it all fits the way you want it to. Do not attach anything at this time. This is just a “test run.” When you are sure of placements, tape the center tree. Our center tree was green. On each side of the center, we had 4 green trees and 4 light trees. Your number of trees may be different.
We then placed 5 wood balls between each tree, and 7 wood balls on each end. We determined the number of balls needed by using a bit of math. Once you lay down your trees, you will know how much space is left over on the twine. That needs to be filled with wood balls. We determined that we could fill the space by placing 5 wood balls between each tree. That left a bit over a foot, so we added 7 wood balls on each end.
Remember that there will be a loop tied on the second end, so leave about 6” open for that.
NOTE: This is a very important step! Before laying out our trees and balls, we thought that 15 trees would be enough. When laid out, we realized that we needed two more trees. It is a good thing we had not tied the trees on yet.
Step 2: String The Balls And Trees Onto The Garland
Cut your twine to the length you have determined you need.
Wind a piece of tape around the end of the cut end of the twine (end without the loop). This will create a “shoestring end” to prevent the twine from raveling when you work with it.
Start running the balls and trees onto the twine. We started with 7 balls for the first end, then added a tree, then 5 balls, then a tree, then 5 balls, then a tree - and on until the end. We ended with 7 wood balls.
Using the loose ends of the top tier on each tree, tie the trees to the twine.
Tie Off End
Once all trees and balls are on the twine, create a loop at the second end of the twine.
Step 3: Glue Tied Areas & Add Tree Decor
After all trees have been tied, cut the loose ends from the top tier head. Add a dot of glue to the tied area of each tree to add security.
Glue the decor onto the trees at the place where they were tied on. This partially hides the tied area.
Watch The Video
Variation That Did NOT Work
Multi-Purpose Spray Adhesive
We used heavy duty spray adhesive to attach glitter to one tree as a test. Bad idea. The tree became very stiff, and the yarn pieces became glued together. I would separate them, but they ended up sticking again.
Our tassel looked like a stiff ghost!
Variation That DID Work
Spray-On Snow
We didn’t add spray-on snow to our garland trees, but we created a snowy tree of each color scheme to show you what spray-on snow looks like. It worked well. A bit of snow came off as the trees were handled, so keep that in mind.







I turned a fallen tree disaster into a beautiful evergreen bouquet for my front porch. Easy! Use holiday items from your stash.