Christmas Village Platform
Build A Wood Platform To Hold Your Village
Do you have trouble finding space for your Christmas village? Turn any flat surface into the perfect place!
Also see:
Lifestyle Blog
Remodel Projects
Wood Projects
Christmas Sewing & Crafts
My father built a platform for every window in his living room. Each held a part of his Christmas village.
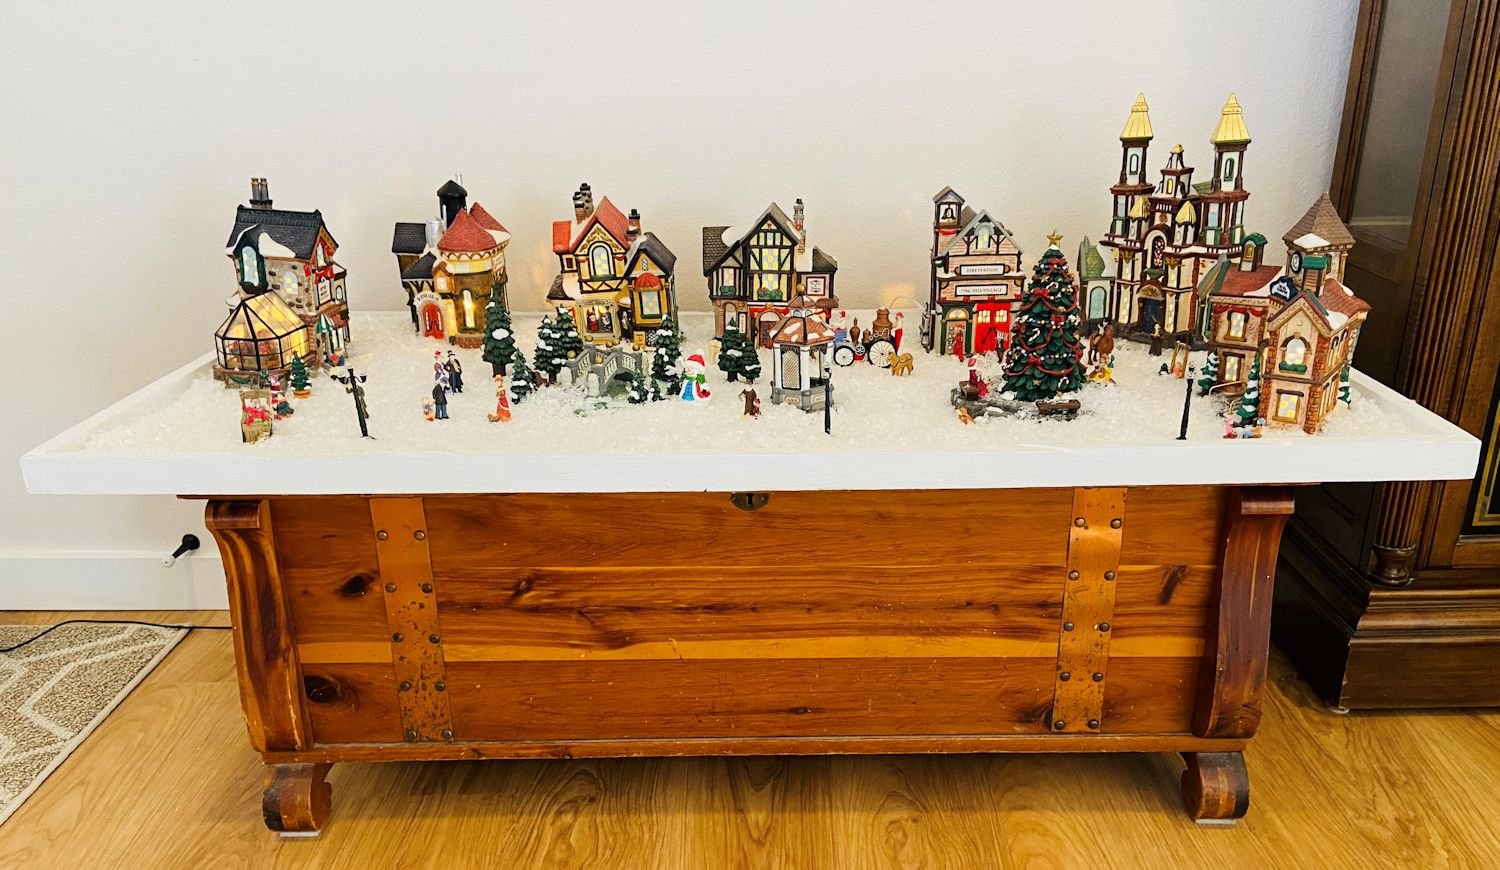
I needed one platform to fit over a cedar chest in my living room. The chest would be protected, and I would have a great space for my village.
Following my father’s example, my husband built a platform to hold our entire village. The tray fits nicely on the surface of a cedar chest.
We provide instructions for an “easy version” and a “fancy version.” The easy version is super simple - YOU can build this. The easy version can be made up of one flat piece of plywood, with a rim around the outer edge to hide the base and contain the snow. That’s it. Painted white, it blends with the “snow.”
Project by Kevin Sherrod
SIZE
Create the village-holding platform any size you need. I made this tray (the village-holding platform) 8" larger than the length and width of the top of my wife's cedar chest. This created a 4" overhang on all sides. The size is up to you. Consider the space and weight of your village. The cedar chest was large enough that a 4" extension on all four sides of the chest top still allowed for proper balance of weight.
Disclosure: This site contains affiliate links. As an Amazon Associate, I earn from qualifying purchases. Clicking on links, and purchasing products, may result in the seller paying us compensation - at no extra cost to you. Affiliate links are in green.
SUPPLIES - project supplies
Outer Rim (trim pieces)
I used pieces of wood measuring .75" x 1.25" for the outer rim. The rim is important because it contains the "snow" and gives definition to the village area. It is made up of trim pieces that are glued or nailed to the side edges of the base piece. They trim the platform nicely, and create an area to contain the snow.
I used 3/8" plywood for the base of the platform.
Other Materials
Check Amazon for prices. Affiliate links are green.
Miter Box - optional but helpful
Christmas VillageChristmas Village Accessories lextension cords, bulbs, street lamps, cute animals, figures etc to add to your village
White paint - primer and top coating
SUPPLIES - general carpentry supplies
Always read all instructions and measure before cutting!
Fancy Version vs Easy Version
The fancy version requires use of a router to cut a notch along the length of the trim pieces, as well as skills for mitering the corners of the trim. Our trim sat on top of the base piece; due to the notch along the long trim pieces, the sides of the trim hung just slightly below the base piece, so the base was not seen from the sides. As long as the trim is flush, the base will not show.
For the easy version, simply cut 4 trim pieces to fit the 4 OUTSIDE edges of the base. You will need 2 short ends and 2 long ends. Glue or nail them the outer edges of the base piece. I mitered the corners of the trim, but that is optional.
See below for full instructions.
The photos below show the platform from the top. The outer rim extends up from the base.
Click photos for larger version (not available on all photos).
DIRECTIONS
Both Versions:
1. Measure the length and width of the surface you wish to place your platform on. Our platform was to sit on top of the cedar chest, so I measured the length and width of the top surface of the cedar chest.
2. Determine which sides will have overhang (will the platform extend beyond the surface it sits on?). For our platform, there was 4” overhang on all sides. This meant that I had to add 8” to both length and width measurements.
For example, if you will be placing your platform on a table that measures 24" x 60", and you wish to have a 4" overhang on all four sides, your finished platform will measure 32" x 68". In other words, when the platform is placed onto the table, it will extend beyond the table by 4" on all sides.
Do not cut the base at this time.
Fancy Version
Follow steps 1 and 2 above.
3. Cut Trim Pieces
The finished rim sits OUTSIDE of the base, so that the outer rim covers the base piece. Only the rim shows from the sides. In this example, the finished platform is 32" x 68". Therefore, I need two rim pieces that are 32" long, and two rim pieces that are 68" long.
Cut Notches
Using a router, cut a 1/2" notch along one side of each rim piece. Refer to the diagram (pretend it is to scale). The base of the platform will fit up into this notch. The diagram shows the END of the trim piece (cross section). The notch is cut along the entire length of the trim piece.
4. Cut base piece.
I knew I would be cutting a 1/2" notch along the bottom of each of my rim pieces (see the diagram in step 5). This took off 1" for the length, and 1" from the width of the base piece. In this example, the base would be cut to 31" x 67".
5. Miter the corners of your rim sides and check for fit. Refer to the diagram.
6. Place the rim pieces around the base piece. When sure of fit, glue or nail the rim pieces to the base piece, with the base fitting up into the notched area of the rim. I glued the rim pieces into place, then used small nails to help secure the rim pieces.
Easy Version
Follow Steps 1 and 2 above.
3. Cut Base Piece
Cut the base piece the size you need for the amount of overhang you wish to have (if any).
4. Cut Trim Pieces
Cut two short pieces of trim the exact width of your base piece. They will be glued or nailed to the short ends of the base piece.
Glue or nail the short pieces of trim to each end of the base piece.
Measure the long edge, with the short trim attached, to determine the length needed for the long trim pieces.
Cut two long trim pieces and attach them to the long sides, using nails or glue.
Both Versions
Paint the finished village platform. Add your village and snow.
Nicely done! I have turned a piece of furniture into the perfect place for my Christmas village.
Click the following 3 photos for larger image on mobile devices.
SETTING UP YOUR VILLAGE
My village is wired, meaning cords run from house to house. I lay out all of my buildings, connect the cords (and set up timing for lights etc) BEFORE adding snow. I can easily replace lights as needed or move the buildings around without snow in the way.
After everything is set up, I add the snow. The snow looks nice, and also hides the cords.
Snow not yet added; cords show
Snow covers the cords
The following photo shows the Christmas village platform in our Arizona home. We painted it to match the wood fish tank cabinet, and the wood trim of the room. My father made the nutcracker man for us.
FATTIGMAN TIME!
Part of our Christmas tradition is to make fattigman, which we eat while decorating. Fattigman is a traditional Christmas cookie that is enjoyed in Norwegian and Swedish homes.
We serve the fattigman along with our other Christmas cookies.
More Christmas Projects
Christmas sewing & craft projects
Home Improvement
Lifestyle Blog
















Protect your wood deck from the elements with proper prep and quality stain. Proper maintenance enhances the life span of a wood deck. Protect from snow, rain, freezing ice, hot sun.