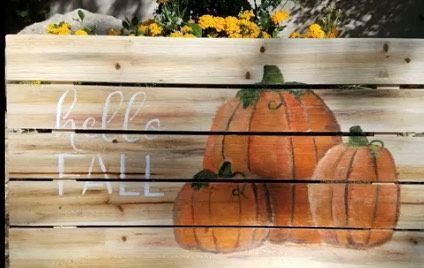
Pumpkin Scene On Wood
decor crafts -> wood
Paint a Pumpkin Scene onto a Wood Palette
Instructions, pattern and video!
VIDEO
The pattern and list of supplies are available below. This project’s full instructions are in my video, from my YouTube channel.
Disclosure: This site contains affiliate links. As an Amazon Associate, I earn from qualifying purchases. Clicking on links, and purchasing products, may result in the seller paying us compensation - at no extra cost to you. Affiliate links are in green.
Also see:
Blog: tips from the workroom & trails
Home Improvement
Art & Painting
Halloween Sewing & Crafts
SUPPLIES
Pattern
I provide a pattern for the pumpkins.
Print the pattern, then enlarge or shrink to fit your project.
Wood Palette
I purchased a wood palette from a craft supply store.
Acrylic Paint / Water / Brushes / Plate (to hold paints)
There are several good brands, but my usual paints are Grumbacher, Liquitex or Golden. I get good results with good quality paint. When starting out, it can be cost effective to get a set of paints. The paints I used, and the paints the links go to, are for interior paints. If using outdoors, use exterior paints. A good, exterior latex paint would work well.
COLORS USED:
(these are the colors I used)
raw umber
burnt umber
raw sienna
burnt sienna
warm gray
payne’s gray
alizarin crimson
hooker’s green
green gold
titanium white
t is a good idea to prime wood before painting. I use clear gesso by Daniel Smith for my wood painting projects. Only the area where you will paint needs to be primed. I painted on a coat of glazing medium (satin) before painting on the pumpkin only because I didn’t have gesso.
Protective Spray
Optional: you can spray on a coat of protective spray, such as Krylon UV protection. I did not do that with this piece. If painting decor that will be placed outside, use exterior paints. My piece was for use inside the house.
SAFETY NOTICE
REMEMBER TO FOLLOW ALL DIRECTIONS AND SAFETY PRECAUTIONS listed on product labels. Work in a well ventilated area. Use a dust mask and eye protection for all cleaning and sanding. Use gloves when using cleaners such as TSP. We did not use that for this project, but I often use it to clean walls before painting.
INSTRUCTIONS
Sand and clean wood wood as necessary. Let dry.
Tape the pattern onto the wood palette. Trace around the pattern. OR use tracing paper to trace the pattern onto the wood. Remove the pattern.
Place the paint colors of your choice onto a plastic coated paper plate (or painter’s palette).
Paint the pumpkins and lettering. Watch the video to see the entire process.
The image below shows the paper pattern lying next to the area I am painting.


Super easy pumpkin pocket placemat. Setting the table can be fun for kids!